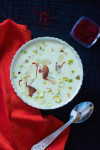
Muesli or Overnight oats with yogurt doesn’t have to be cooked and is a fiber and protein-rich breakfast made from raw rolled oats, grains, nuts, and fruits. All you have to do is soak uncooked oats in milk and then stir in yogurt, nuts, fresh fruits and honey.

Additionally, you can also add chia seeds, flax seeds, available fruits and top it with granola. Healthy can be delicious too if you like to eat your oats this way. You can make it a day ahead and refrigerate for a busy morning.
Since breakfast is the most important meal of the day, having something like this will keep you charged up and full.
I am a big believer of, ‘you are what you eat,’ and I must say, I have felt a tremendous difference in my energy level when I eat no-nonsense food. Muesli is also something you can have if you are trying to avoid junk because it keeps you full for a long time.

Also, try the homemade clustered granola with blackberry compote and the oatmeal fruit smoothie if you are looking for healthier breakfast options.
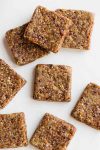
Finely chopped or grated apple imparts a natural sweetness, and this is something I love about muesli. Let’s hope this keeps the doctor away too:). The different flavors and textures make it taste splendid.

On the other hand, you can add flavored yogurts to make Muesli more enjoyable.
P.S: SINCE PAST FEW WEEKS, I STARTED A NEW SECTION BELOW THE POST WHICH SAYS ‘BLOGGING TIT-BITS.’ IF YOU ARE INTERESTED IN BLOGGING, IT MIGHT BENEFIT YOU. PLEASE FIND IT BELOW THE RECIPE.

- 1 cup rolled Oats
- 1 cup Milk You can also use Almond milk, soy milk or coconut milk
- 1/2 cup yogurt
- 1 apple finely chopped
- 1/4 cup sliced almonds or chopped walnuts
- 2 tablespoons honey or to taste
- berries of your choice
- 1 tablespoon chia seeds (optional)
-
Add Oats, chia, and milk in a bowl and let it soak for 20 minutes.
-
To this add yogurt and honey and mix well. Add the apples + nuts + berries.
-
Mix and serve chilled or at room temperature.
Muesli can be made overnight too. If you are making ahead of time, mix everything together and refrigerate.
TIT-BITS OF BLOGGING:
What is blogging without beautiful photography? There is still a long way to go, but so far my precious resources were:
- Tasty Food Photography book |by Lindsay of pinch of yum, (Affiliate link) has been the best resource purchased so far.)It taught me the basics of DSLR and food photography.
- Another great book that helped me with angles and styling was The FOOD PHOTOGRAPHY BOOK | By Nagi of RecipeTinEats.(Affiliate link)
3. When it comes to photography, editing does the magic. I learned Lightroom editing from Rachel of Two Loves Studio. She has some great tips to improve Food photography. Don’t forget to subscribe to her newsletters for valuable insights.


 HEY THERE! HAPPY TO SEE YOU 🙂