This pizza crust tastes just like the regular pizza, and you won’t tell its made from whole wheat pizza dough.

This pizza crust is crisp and chewy and is made from 100% white whole wheat flour. White whole wheat flour is milled from the white wheat berry and contains the same nutrients found in the regular whole wheat flour.
The best part is that the resulting texture is milder which makes it an excellent substitution for cakes and cookies. I have used white flour for Whole Wheat Apple Cinnamon Muffins.
If you haven’t made pizza dough at home, it can be overwhelming, but try it once, and you will know that it’s super easy.

The Dough: Classic pizza dough is made from regular all – purpose flour, sugar, yeast and warm water. The difference in texture comes from the type of flour used.
The different kinds of flour you will find in the market are regular bleached all-purpose flour, unbleached all-purpose flour, and bread flour.

The healthy Dough: If you are trying to go healthy, then you must try the white whole wheat flour. Back in States, I used the King Arthur white whole wheat flour. Here in Dubai, I use the Tesco brand, which is available at Choitrams.
If you don’t want to use whole wheat, then use unbleached all-purpose flour or bread flour. The texture will be chewy.
But in some places like India, where the baking trend is just coming up, access to different types of flour might not be easy. In that case, use the regular all-purpose flour or maida.
If healthy is your motto, then try this WHOLE GRAIN HOT CROSS BUNS or WHOLEWHEAT SWEET POTATO SANDWICH ROLLS.

Sweet, Cheesy and Delicious!

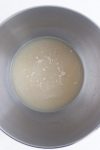
Step1: Add warm water, yeast, and honey to a mixing bowl and stir. Keep it aside for 10 minutes. (I heat water in the microwave for 40 seconds). Remember hot water can kill the yeast so the temperature should be lukewarm.
You can also use sugar to feed the yeast. But since we are trying to keep it healthy, I figured honey would be a better choice.

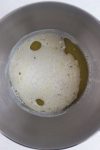
Step2: Add salt and olive oil. Mix it and then add flour.
Depending on the type of flour you are using, you might need more or less of it. The amount also depends on the humidity and temperature around you.
Olive oil yields a better flavor.

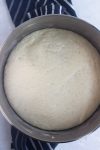
Step3: The key here is to knead the flour well until it is slightly sticky but not dry. Cover with a damp cloth and let it double in size.
You homemade Pizza dough is ready!
Punch it down, divide into two and you are ready to roll.

Step4: Preheat the oven to its highest temperature for 30 minutes.
Step5: Lightly flour the surface and roll the dough with a rolling pin. I patted it down with my finger which also explains why it is not even close to the perfect shape. You can keep crust thin or thick but the baking time will vary. Refer the recipe for time.
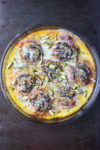
Step6: Spread sauce, add your cheese and your favorite topping and bake only for 13 minutes on the oven floor. For the Hawaiian style vegetarian pizza, please refer the notes.
You can also freeze the dough for later. Check out the instructions below.
P.S: Check this Weeks blogging tips below the recipe:

- 1 cup warm water (Please refer notes)
- 2 and 1/4 teaspoon active dry yeast
- 3 tablespoons honey
- 1 and 3/4 cup white whole wheat flour (May need additional few tablespoons)
- 2 tablespoons olive oil
- 1 and 1/2 teaspoon salt
- cornmeal or Semolina, for dusting
-
Add warm water + yeast + honey to a bowl and stir it. Let it rest for 10 minutes until the yeast bubbles. (I heated water in the microwave for 40 seconds. It should be lukewarm and not very hot.)
-
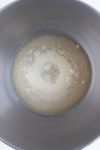
After 10-15 minutes the mixture will be frothy. If it doesn't froth, the yeast might be old, or the water might have been too hot.
-
Now add olive oil and salt and mix.
-
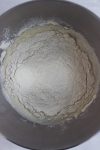
Add 2 and 1/2 cups of flour and mix with hand or a dough hook till the dough is smooth and elastic. Add the remaining flour as needed.
-
The dough should be slightly sticky. When you touch, it should feel sticky, but it should not stick to your hands.

-
Lightly oil the dough and cover it with a damp cloth. Let it rest in warm place for 40 minutes to an hour or till the dough almost doubles in size.
-
Punch down the dough and divide it into two. Cover and let it rest for additional 10 minutes. Preheat the oven for 20 minutes on 250 Degrees Celsius / 480 Degrees Fahrenheit. (It's the highest temperature in my oven, you can increase it up to 500 Degrees Fahrenheit.)
-
Transfer the dough onto a lightly floured surface and roll in with a rolling pin or spread with your hands. Flatten it into a 12-inch circle. With your fingers create an edge by lifting the sides.
-
Sprinkle cornmeal or semolina on a cookie sheet on a pizza stone and transfer the pizza base. Spread the sauce. (Please refer notes to avoid a soggy crust).
-
Add your favorite topping.Sprinkle some olive oil, especially towards the edges. (Available in notes)

-
Place the pizza on the floor of the oven and bake for about 12 minutes. Transfer the pizza to the top rack of the oven and cook for additional 2 minutes.
-
Slice and Serve.
TO AVOID SOGGY PIZZA: Try to use less sauce. I like to use ketchup because it is less watery. If you are adding sauce, brush the crust lightly with oil.
THIN CRUST PIZZA: If rolling into a thin crust, only bake for about 10 minutes.
TO FREEZE FOR LATER: Let the dough rise entirely and then divide the dough, lightly oil and place it in a freezer-safe bag. Squeeze out the air and seal it. Label the date and freeze it for up to 2 months.
TO THAW: Pull it out from the freezer and leave it in the refrigerator for 10-12 hours and leave it on the counter for 30 minutes before you roll it.
If you want to make it on short notice, drop the packet into a bowl filled with water, and it should thaw in about 30 minutes to an hour. Be careful not to let the water in. Wipe the bag and transfer it carefully onto a lightly floured surface.
TOPPINGS (For 1 Pizza)
1/2 cup pizza sauce or ketchup
1 and 1/2 cup shredded mozzarella cheese
1 cup pineapple chunks
1/2 red onions, sliced
1/4 cup finely chopped cilantro
2 tablespoons red chilly flakes for garnish
TIT-BITS OF BLOGGING:
If you are looking to invest in your composition and styling skills, head over to two loves studio. You will find free tips and techniques. You can also enroll in some of the courses. I have signed up for Composition Essentials, and I am super excited.
P.S: It’s not an affiliate link, which means I don’t get paid if you join.:)


 HEY THERE! HAPPY TO SEE YOU 🙂